Code-Along: What Does the Cat Say?
Follow these instructions to build a website that will provide the user with some pictures of cats saying messages. Not to be confused with The Fox.
Click here to view the Cat Says Starter project. Copy the project to begin the activity.
Part One: Background
Before diving into the activity, take some time for research and planning.
The Starter Code
The starter project has quite a bit of code, but it's all HTML and CSS! In the index.html file, there are a few elements of note:
- An
<input>with anidof"cat-message" - A
<button>with anonclickof"run()" - An
<img>with anidof"cat-pic"
All of these elements will be necessary to make the website functional.
There is also some code in the script.js file already - specifically, the definition for a function named speak. This function uses the TikTok Text-to-Speech API to speak whatever message is passed to it.
The Cat as a Service API
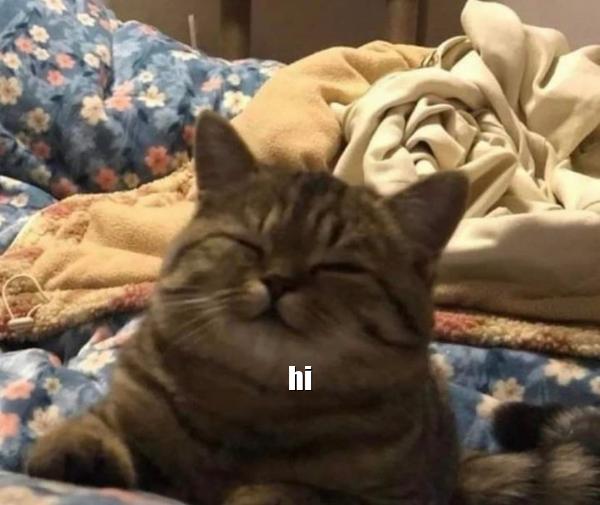
The cataas API has a ton of different ways to access random cat pictures. One of its most powerful features is to embed messages right onto images. This is possible with the /cat/says/ endpoint.
For example, the URL to get a random cat saying "hi" would look like this: https://cataas.com/cat/says/hi
Notice that the message hi is actually not a query parameter - it is simply part of the URL path!
It ends up looking something like this:
The Plan
To utilize this API, the code should:
- Grab the message from the text box
<input>on the page - Create a new image url by appending the message appropriately
- Set the
srcof the<img id="cat-pic">to be the URL - Speak the response using the TikTok Text-to-Speech API
Part Two: Hooking Up the Button
First, define an asynchronous function to run when the button on the page is clicked.
- Open the script.js file for editing
- There, define a new function named
runto match theonclickof the<button> - Add the
asynckeyword in front offunctionto make it asynchronous - In the body of the function, create a new variable named
catPic - Use
document.querySelectorto store the<img id="cat-pic">in thecatPicvariable - Under that, set the
srcofcatPicto be a loading indicator image
Run the project, click the button, and verify that the loading indicator shows up! The code in the script.js file should look something like this:
async function run() {
  let catPic = document.querySelector("#cat-pic");
  catPic.src = "https://media.tenor.com/o8m3bKTsifUAAAAM/hold-on.gif";
}
Part Three: Getting the Message
The next step is to grab the text from the text box, aka the <input> from the HTML.
- Make a new line in the body of the
runfunction - There, create a new variable named
messageInput - Use
document.querySelectorto store the<input id="cat-message">in themessageInputfrom the HTMl - Under that, create a new variable named
message - Store the
valueof themessageInputelement in themessagevariable
For testing purposes, throw an alert in the code to display the message result. Then, run the project, enter a message in the box, click the button, and verify that the message appears! Remove the alert after testing. The added code should end up looking something like this:
let messageInput = document.querySelector("#cat-message");
let message = messageInput.value;
Part Four: Setting the Image Source
Next, set the image URL based on the message.
- Make a new line in the body of the
runfunction - There, set the
srcproperty ofcatPic - Set it to a new template literal
- Start the template literal with the base URL:
https://cataas.com/cat/says/ - Add the message at the end of the URL with
${message}
That's it! The line of code added should look something like this:
catPic.src = `https://cataas.com/cat/says/${message}`;
Part Five: Speaking the Part
Luckily, there is already a function defined to make the HTTP request. Here's what the speak function does:
- Creates
ttsUrlandbodyvariables to setup the request with the necessary data - In a
tryblock, performs afetch - In the
fetch, passes the appropriate data, includingmethod,headers, andbodyto thettsUrl - Converts the
responseto JSON - Creates a new
Audioobject given the response data - Plays the audio after one second
It basically does all the work! The only thing needed within the run function is to call the speak function, await it, and pass in the message from the user. It should look like this:
await speak(message);
Run the program, enter a message, click the button, and hear the wonderful Bradley Cooper-inspired voice speak the cat's message!
Conclusion
By the end of the code-along, the added code in the script.js file should look something like this:
async function run() {
  let catPic = document.querySelector("#cat-pic");
  catPic.src = "https://media.tenor.com/o8m3bKTsifUAAAAM/hold-on.gif";

  let messageInput = document.querySelector("#cat-message");
  let message = messageInput.value;

  catPic.src = `https://cataas.com/cat/says/${message}`;

  await speak(message);
}
Next Steps
Click here to see how you can make more updates to the Cat Says site!