Challenges: Menu Application
Complete these challenges based on an online menu.
Click here to view the Menu Application project. Copy the project to begin the challenges.
Background: Application Testing
Run the project, and see how the application works:
- A selection of items appear, each with a name, picture, description, and red + button
- Clicking the + button for an item will add it to the cart table
- The cart table will appear below the menu after an item has been added
- If another item of the same name is added, the quantity will increase
- The cart will calculate the total price for all the items
This application is functional, but it is certainly not perfect.
Background: Code Overview
There is quite a bit of code that makes this work:
- The code in the index.html file is fairly simple
- Of note, there are
<div>elements withids ofitem-containerandcart-container
- Of note, there are
- The code in the style.css file is somewhat complex
- However, it does not affect much of the functionality of the website
For these challenges, the important part of the project will be the script.js file. This is the code that actually runs the site!
The sandwiches Array
At the very top of the script.js file, an array variable named sandwiches is defined. Each element in this array is an object with the following properties:
namedescriptionpricepic
This data is used to build the menu on the page!
The cart Array
Under the sandwiches variable, there is another array variable named cart. This is initialized to an empty array, but it will keep track of all the items the customer would like to add.
The addItemToCart Function
Under the cart, there is a function named addItemToCart. This function takes in an item object as a parameter, and adds one of that item to the cart! It follows this process:
- Find any existing items in the cart with the name of the new
item - If there is NOT an existing item...
- Create a new item object
- Set the proper properties on the object:
name,price, andquantity(1) - Push the object into the
cart
- If there IS an existing item...
- Grab the item from the cart
- Increase the quantity of the item by one
- Finally, call the
viewCartmethod to update the cart table
This function will be used by the buildMenu function, and hooked up to the plus buttons on the page!
The buildMenu Function
Under the addItemToCart function definition, there is a function named buildMenu. This function takes in an array of items as a parameter, and displays each of them on the page! It follows this process:
- Grab the
<div id="item-container">from the HTML- Stored in a variable named
itemContainer
- Stored in a variable named
- Use
forEachto loop through every element in theitemsparameter array, and for eachitemvalue...- Create a new
<div>element, stored in a variable nameditemElement - Set the
innerHTMLofitemElementto contain:- An
<img>pointing to theitem's picture - A
<h2>with theitem's name, and a plus button in a<span> - A
<p>with theitem's description
- An
- Grab the newly created
<span>+</span>, stored in theplusButtonvariable - Use
addEventListenerto handle"click"events on theplusButtonby...- Calling the
addItemToCartfunction onitem!
- Calling the
- Finally, append the new
itemElementto theitemContainer
- Create a new
This function will be called once, just as the page loads!
The viewCart Function
Under the buildMenu function, there is a function named viewCart. This is the most complex of the functions in the script.js file. It displays a table with every item in the cart array. There are many different parts to this function.
Cart <table> Setup
The top of the function prepares the HTML <table> element. It follows this process:
- Grab the
<div id="cart-container">from the HTML- Stored in a variable named
cartContainer
- Stored in a variable named
- Set the
innerHTMLof thecartContainerto include...- A
<table> - A
<tr>within the<table></table> <th>elements within the<tr>for Item, Price, Quantity, and Total
- A
- Grab the newly created
<table>, stored in thecartTablevariable
Now the cartTable is ready for item rows!
Looping Through the cart with forEach
The next part of the function loops through each item value in the cart, and adds a row to the table for each one. It follows this process:
- Create a new
<tr>element, stored in a variable nameditemRow - Correctly format the price in the
itemPricevariable - Calculate the total for the row, stored in the
itemTotalvariable - Set the
innerHTMLof theitemRowto include...- A
<td>for theitem's name - A
<td>for theitem's price - A
<td>for theitem's quantity - A
<td>for theitem's total
- A
- Finally, append the new
itemRowto thecartTable
By this point, every item is in the table - but it's not done just yet!
Adding the Final Cart Table Row
There will be one row of the cart table that includes the total of all items together. This part follows this process:
- Create a new
<tr>element, stored in a variable namedfinalRow - Use
reduceto sum up the grand total of all the items together (grandTotal)- This takes a function with two parameters: the
total, and thenextitem- The total from the
nextitem is added to thetotal, and thenreturned
- The total from the
0is passed as the starter value for thetotal- Note: This is an advanced topic, so don't worry too much about fully grasping it!
- This takes a function with two parameters: the
- Set the
innerHTMLof thefinalRowto include...- A bolded
<td>saying "Total" - A bolded
<td>containing thetotalCost
- A bolded
- Finally, append the
finalRowto thecartTable
That's all! The <table> in the HTML will now contain a header row, a row for each item, and a final row. The viewCart function is called every time a new item is added to the cart.
The End
The last thing to do is to call buildMenu on the sandwiches array - this adds all the sandwiches (as well as their plus buttons) to the page!
There is quite a bit of code, but learning how to navigate and update existing code (even if it's a little difficult to understand) is an incredibly valuable skill to learn. Try to complete some of these challenges to practice.
Challenge 1: More Sandwiches
Currently, there are only three sandwiches. This is a pretty weak offering. Update the initial sandwiches array to include at least two (2) new items!
What to Add
This menu can contain anything you would like! Feel free to change it up and offer entirely new options as desired. They don't even have to be food items!
Challenge 2: Menu Item Prices
Currently, the menu displays the name, picture, and description for each item. However, the price is not displayed anywhere! Update the itemElement HTML to include each item's price!
Where to Add the Price
There are a few different ways to display the price. For example, it could look be added within parentheses at the end of the description:
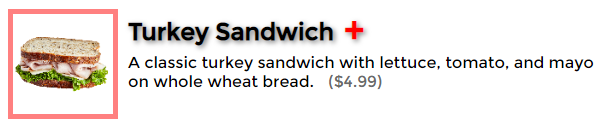
The important thing is add the dollar sign, and try to make it stand out a little bit. Play around and see what looks good!
Challenge 3: Removal Button
Currently, once an item has been added to the cart, there is no way to remove it. This may be good for business, but customers may not like it very much. Add a removal button to each menu item that will remove the item from the cart!
There are a few ways to do this, but the ultimate goal is to have a - button next to the + button that will reduce the quantity of the given item in the cart by 1. If it exists...
Added Challenge: Dynamic Display
For the base of this challenge, the - button could be displayed regardless of how many items are in the cart. As an added challenge, try to show the - button only when there is at least one of the item in the cart.
Challenge 4: Cart Quantity Updates
This challenge may involve a fair amount of additional work. Currently, the Quantity of each item in the cart is displayed as a static number. Turn each Quantity cell into a dynamic, update-able value. It could look something like this:
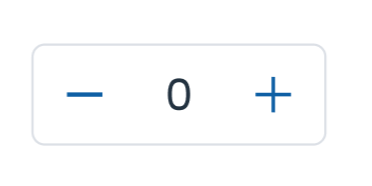
Note that with every quantity update, the cart (and total price calculations) should update as well.
Challenge 5: Cart Storage
The site is coming together, but what if a customer accidentally closes out of the page before they checkout??????? What would we do???? All their hard work of building their cart would be gone!!!!!!!!
Luckily, there is a way to persist data locally.
Background: Local Storage
This is possible using something called localStorage - it's basically a way to store data in the browser for a given user. This can make basic front-end web applications much more powerful!
localStorage has two main functions: storing values (setting), and retrieving values (getting).
Setting an Item
Setting an item looks like this:
let myValue = "This will be stored";

localStorage.setItem("myValue", myValue);
Getting an Item
If an item has already been stored, you can get it like this:
let myValue = localStorage.getItem("myValue");
Challenge
Update the project so that instead of storing everything in a local cart variable, all the data is stored in a localStorage item.